• Skip to primary navigation
  • Skip to main content
  • Skip to primary sidebar

Eat Well, Travel Often Podcast logo

  • Home
  • Listen
    • Latest Episode
    • on Apple Podcasts
  • Food
  • Travel
  • Advertise
  • About

May 25, 2020 By Melissa Goldberg

Interview with Elana and Yaniv Livneh and Bary Yogev, Liv Bread

May 18, 2020 By Melissa Goldberg

Interview with Max Goldman, FarmLink

May 11, 2020 By Melissa Goldberg

Interview with Dr. Mona, Functional & Integrative Medicine

January 31, 2020 food

Elementary Chocolate Chip Meringue Cookies

When I was a kid I loved making meringue cookies. Recently, my mother was cleaning out her recipes and came across this recipe in my handwriting from elementary school! It looks like I wrote it on a page from one of those “blue books” that we used to take exams in school. My handwriting looks nothing like that today!

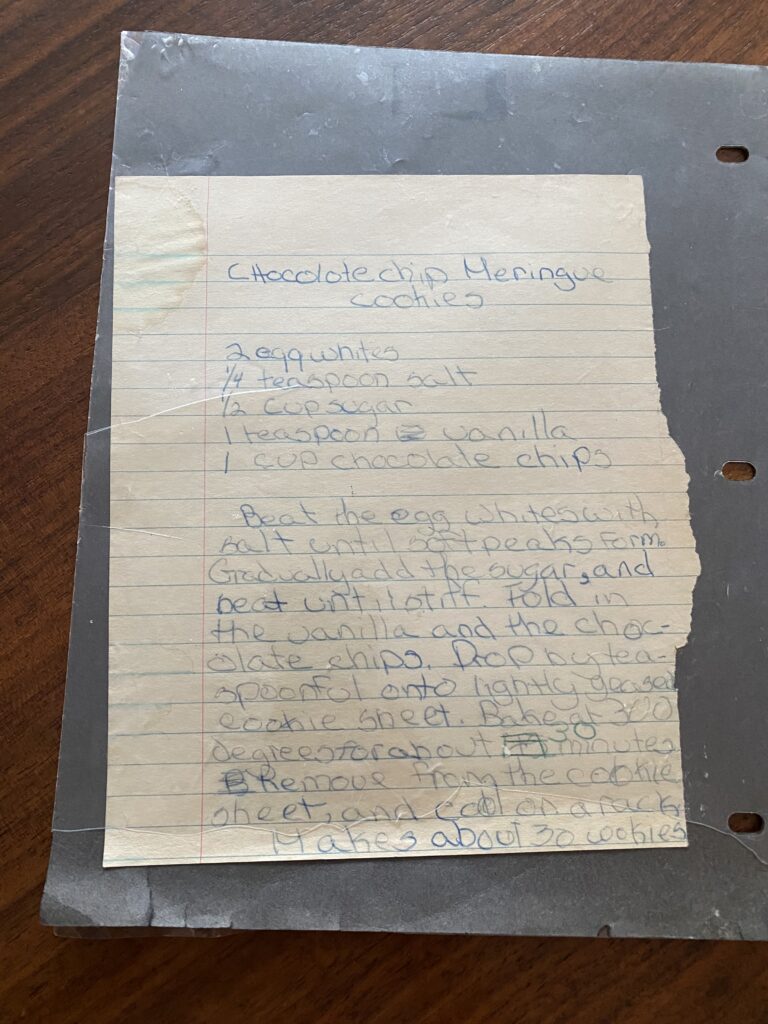
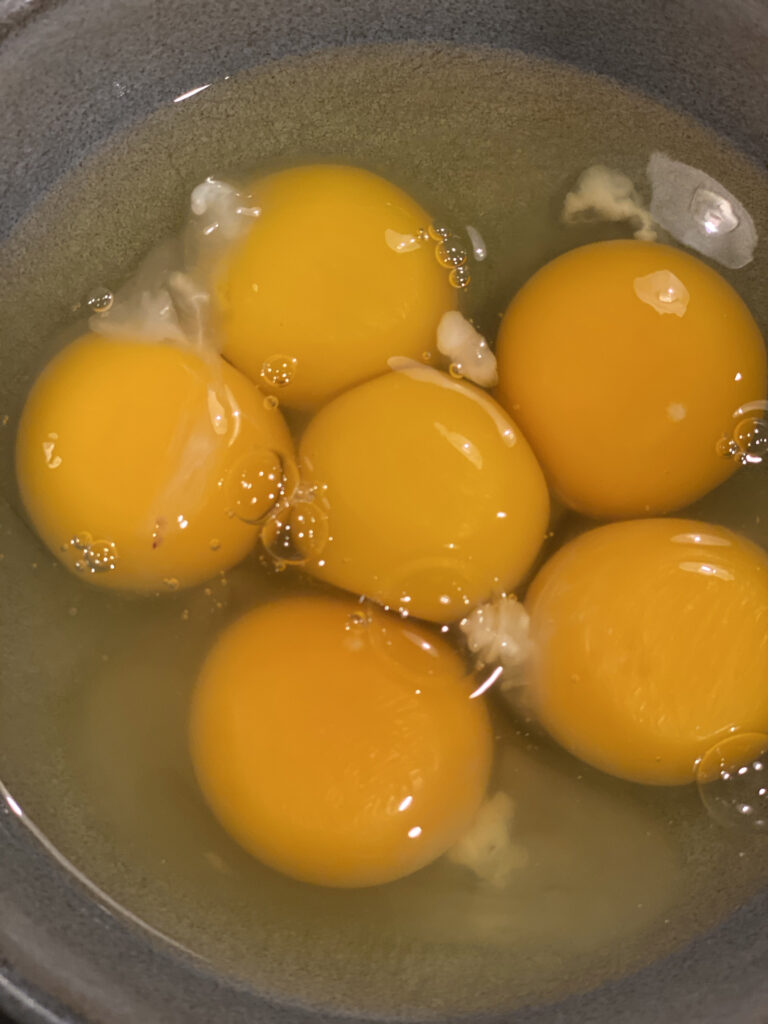
Meringue cookies are so easy and uncomplicated to make. With just four ingredients they are great to make with kids. Probably the most complicated thing to do in the recipe is separate the whites from the egg yokes. I like to use an egg separator especially when cooking with my son.

My son loves to make them and they never last more than a day in my house.

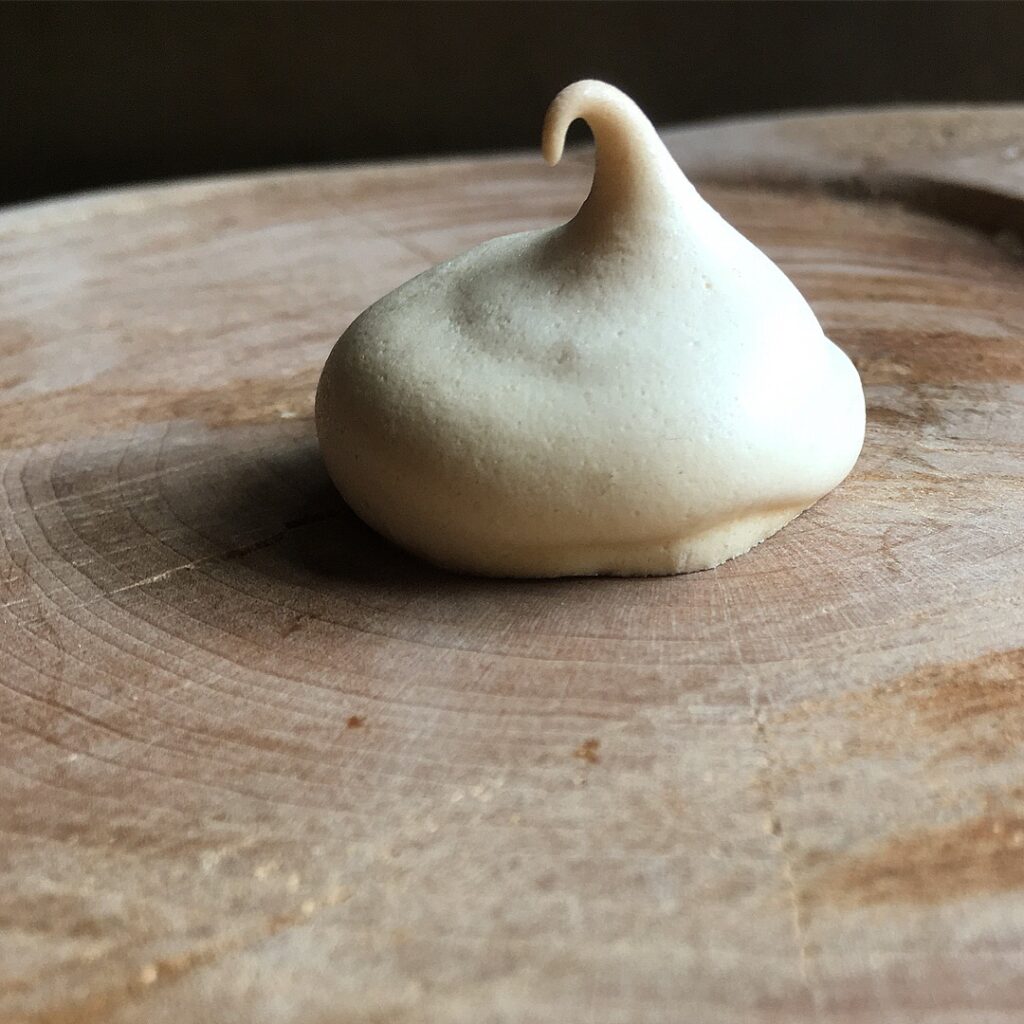
If you want to make them look pretty, you can use a pipping bag and drop in “kisses shape,” however, you need to forgo the chocolate chips. They clog the pipping tip!

Print Recipe

Chocolate Chip Meringue Cookies

These chocolate chip meringue cookies so easy to make. They are crisp on the outside and gooey on the inside. Nobody can resist them — even your gluten free friends!
Course: Dessert
Servings: 30 cookies

Ingredients

  • 2 egg whites
  • 1/4 tsp salt
  • 1 tsp vanilla extra
  • 1 cup semi-sweet chocolate chips

Instructions

  • Preheat oven to 30 degrees.
  • Line two cookie sheets with parchment paper or silicone mat.
  • Beat eggs whites with salt until soft peaks form.
  • Gradually add the sugar and beat until stiff.
  • Fold in vanilla and chocolate chips
  • Drop mixture by teaspoon full onto cookie sheet.
  • Bake for 30 mintues.
  • Remove from cookie sheet and cool on rack.

Notes

Note:  If you prefer to use a piping bag to create cookies, leave out the chocolate chips and just sprinkle over after they are on the tray.  The chips clog up the nozzle of the bag.  

January 29, 2020 travel

Travelogue: US National Parks (California, Nevada, Utah, Arizona)

The United States has 61 National Parks scattered across 29 states. The first National Park was established in 1872 by President Ulysses S. Grant;  but it was not until 1916 that President Woodrow Willson created the National Park Service and system when he signed the Organic Act into law.

The law stipulates that the park service was to “conserve the scenery and the natural and historic objects and the wild life therein and…leave them unimpaired for the enjoyment of future generations.”  

When I was young, after my parents divorced, most of my traveling was done with my mother. One of my favorite trips was visiting the National Parks. In 1990, I had been living in Southern California and was moving back East. My mother and I drove up the Pacific Coast Highway from Orange County to Yosemite, then down to Las Vegas, out to Bryce Canyon, Zion, Lake Powell, the Grand Canyon, finally heading to Sedona and ending in Phoenix, AZ. The trip was so ingrained in my brain that I wanted to take a similar trip with my kids when they were old enough to appreciate the parks.

When my mother and I planned our trip, 30 years ago, there was no world wide web, no mapquest, not Apple Maps. We used AAA to create TripTik flip book maps. Back in 1990, you would call AAA to have them plot your navigation from point-to-point. The AAA agent would literally print out the map pages of your journey and then start marking up each page with a bright fluorescent yellow highlighter. Now AAA TripTiks can be created using their online program.  

For my family vacation, I decided I would plan the trip myself, map it out on google maps. Truth be told, with today’s rental cars navigation, getting from point-to-point is a breeze. 

As far as planning the trip, I first made a list of places I wanted to visit, emulating the my trip with my mother, and used google maps to calculate out distances, hotels, rest stops, etc. 

My mother and I stayed in the Ahwahnee Hotel located on the floor of Yosemite Valley and loved it so much that I figured I would see what dates were available and work around that. Getting reservations at the hotels and lodges located within the park system can be challenging to say the least. Especially the summer months, these historic lodges are often booked-up a year in advance!

When my husband Lewis and two sons, Elijah and Nathan, arrived in San Francisco we hit a few key sites, Ghirardelli Square, and Lombard Street with a quick stop to see a relative for lunch. Then we were off for a 4 hour drive to Yosemite. We arrived at the park just before nightfall with just enough light to take in the majestic granite walls of Half Dome and El Capitan. 

After breakfast the next morning, we took the free park shuttle to Yosemite Valley Lodge to rent bikes. Yosemite Valley has 12 miles of flat bike paths and pedal poweris the easiest way to get around the park. We quickly biked passed traffic at a dead-stop heading east towards Half Dome. We all giggled a bit at the people stuck in their cars while we pedaled in the glorious sunshine. Riding along the bike paths of the park, we took in the sheer majesty and awe-inspiring nature of Yosemite. We stopped to let the kids take a chilly dip in the Merced River that weaves across the valley floor. The bike paths loop all around the floor and you can stop whenever you want. Heading back west we detoured to get up close to the base of El Capitan catching a glimpse of rock climbers halfway up the walls.  

TRAVEL TIP:  Rent bikes in Yosemite. You can navigate the valley floor much better and stay out of traffic.  

Cycling in Yosemite

The next morning on the way out of Yosemite, we stopped at Tuolumne Grove to walk among the giant Sequoias trees and out via the Tioga Pass stopping at Mono Lake, a salt water lake just on the east side of Yosemite that was formed about 760,000 years ago!  There are many columns of limestone that rise above the surface of the lake called Tufa.  Since we are skiers, I thought it would be fun to stop a Mammoth Mountain to take a ride up the lift but we got there too late and missed the last ride up!  So if you want to do that check the schedule!  

Sequoia in Tuolumne Grove

The US National Parks are truly natural wonders, each with its own unique ecosystems, and each an important part of the natural history of the United States. 

Tufa columns at Mono Lake

TRAVEL TIP:  Must stop at Alabama Hills, Lone Pine, CA to visit amazing rock formations.

Our next national park on the list was Death Valley and the only real town just right outside was Lone Pine, CA. We had no idea this would be a highlight of the trip. Located in central California, Lone Pine is at the base of the Sierra Nevada mountains and is home to the Alabama Hills, an area of amazing rock formations and the popular filming locations for movies and some television shows. More than 150 movies were filmed there including Iron Man, Gladiator, Django Unchained and Lewis’ favorite, Tremors. After breakfast at the Alabama Hills Bakery & Cafe, whose walls are painted with cartoonish drawings of the different rock formations, we headed off Highway 395 to climb the rock formations. We had the entire area to ourselves taking our time driving through the area and climbing the rocks. 

Walls of the Alabama Hills Bakery & Cafe in Lone Pine, CA

Then we were off to Death Valley to see the lowest point on dry land in the world, and then the brightest — Las Vegas!  Driving through Death Valley is a thrill, you slowly descend to more than 100 feet below sea level! We were lucky to spot a coyote crossing route 190 on our way to Stovepipe Wells — the inspiration for the movie Cars. We made a quick stop at Mesquite Flat Sand Dunes then headed to Badwater Basin, which sits at 282 feet below sea level, the lowest spot in the world. The temperature was well over 110 degrees! 

Driving through Death Valley

While my husband and I loved all the nature, if you ask my kids their favorite part of the trip — Las Vegas is top of the list. They loved the wave pool and aquarium at the Mandalay Bay, the rides at the top of the Stratosphere, walking through the casinos and the downtown container park. In the evening we treated them to the Cirque du Soleil show O at the Bellagio. Out of the number of different, Cirque du Soleil shows in sin city, we feel this is by far the best. A two day reprieve in “civilization” was enough, and then we were off to Zion National Park in Utah. 

Ride at the top of the Stratosphere

Utah’s Zion National Park has become one of the most visited national parks in the US and we saw why. From its box canyons, wildlife, flora and fauna, the park is visually breathtaking. We only spent one night there and it was not nearly enough. Luckily, we had the chance to overnight at the only lodge located within the park, the Zion Lodge. If you can, I highly suggest you stay here. During the busy months, March through November, cars are not allowed in the park, but there is a free shuttle to get around. There is no light pollution within the park from cars making stargazing incredible. You can sit on the benches around the lawn of the lodge, stargaze and watch the deer come to feed at night.

TRAVEL TIP:  Overnight at Zion Lodge to witness a sky full of stars and deer feeding on the lawn of the lodge.

Entrance to Zion National Park

In the morning, we were off for our two hour drive to Lake Powell, the reservoir behind the Glen Canyon Dam park of the Glen Canyon National Recreation Area. The lake is fed by the Colorado River and borders Utah and Arizona. Created by the flooding of Glen Canyon, there is so much to do around the region that we spent two nights in the area. We took a helicopter ride over the lake and landed on Tower Butte, a raft trip on the Colorado River to Horseshoe Bend, the kids went swimming in the lake, jumping off the side of the lake walls and we visited Antelope Canyon.

Antelope Canyon, an extraordinarily beautiful slot canyon on Navajo land in Page, Arizona, was created by the erosion of Navajo Sandstone to form flowing smooth walls and shapes. Time your visit right and you will be treated to sunlight pouring in creating delightful beams of light streaming in the canyon. 

TRAVEL TIP:  Take a tour of Antelope Canyon to marvel at the beauty of this slot canyon.

Beautiful Walls of Antelope Canyon

TRAVEL TIP:  Stop at Slide Rock State Park just North of Sedona to get a thrill ride down a natural water slide.

Our last stop before heading home was Sedona. On the way to Sedona we stopped at Slide Rock State Park, a historic apple farm outside of Sedona. But you are not stopping for the apples — you are stopping for the natural water slide. Slide Rock is an 80 foot long water slide. Algae makes the rocks slippery and the flow of constant water has worn the sandstone to create an ultimate natural water park and swimming experience! Our final activity was the Broken Arrow Pink Jeep Tours, an off road thrilling ride up and down the red rocks of Sedona at times as steep as 45 degrees!

Phew! This 10 day trip is well worth it if you have time. We went during August which is peak season and the weather can be very hot in certain areas, so plan accordingly. In addition, book well in advance. If you have a child going into or in 4th grade, check out the National Parks Foundations “Every Kid in a Park” campaign — 4th graders and their families get free passes to every park.  

If you have any questions or want to share you experience, please reach out to me via email melissa@eatwelltraveloften.net or on social media. 

January 27, 2020 podcast

An interview with Charles Platkin: The Diet Detective

https://media.blubrry.com/eatwelltraveloften/p/content.blubrry.com/eatwelltraveloften/EWTO_Charles_Platkin_FULL_SHOW.mp3

Podcast: Play in new window | Download | Embed

Subscribe: Android | RSS

Charles Platkin: The Diet Detective

For more than two decades, Dr. Charles Stuart Platkin, PhD, JD, MPH as been working to uncover the mysteries and myths surrounding food, nutrition, fitness and medicine. Started over 20 years ago, his non-profit Diet Detective has been educating and inspiring consumers to make meaningful changes in their lives. Charles teaches consumers to know the difference between facts and alternative facts, science and pseudoscience and getting to the truth about nutrition, food, health and the planet. He is the author of seven books. His first book, “Breaking the Pattern” was a bestseller in hardcover; it has been used by addiction clinics to assist patients with resolving drug and alcohol-related issues. He is also executive director of the Hunter College NYC Food Policy Center.

Charles and I have known each other for over two decades. We first met in 1998 when he launched a health and fitness website called eFit. I was his communication director.  I also handled the publicity for a few of his books and his yearly airline food survey. So excited to talk with my friend!

Photo Courtesy of Alaska Airlines

Links to Charles Platkin’s social media and other items mentioned in the interview.

Instagram @dietdetective

Website: https://www.dietdetective.com

Diet Detective Airline Food Survey 2019

Diet Detective Airline Water Investigation

Subscribe to Diet Detective Newsletter

Banana Saver

Book to Plate Segment

Netflix’s Chef’s Table:  Grant Achatz, Alinea

Alinea Restaurant, Chicago

Dialogue Restaurant, Santa Monica, CA

Photos of meal.

  • Welcome to the Counter
  • Autumn 2019 Menu
  • pimenton, coriander bubbles
  • mountain magic tomatoes, thoughts of spain
  • hamachi, peanut, charred lettuce
  • red pulse seaweed, uni, yuza, kosho
  • broccolini and passonfruit bearnaise
  • strawberry “shave ice”
  • “regrowth of sorrel”
  • smoked maitake and cannellini a la Robuchon
  • “the best part of apple picking”
  • brussels, bartlett, venison
  • “rabbit in the haystack”
  • “sturgeon and its eggs’
  • corn, hazelnut, truffle
  • pork, butternut, burnt orange
  • beef, cipollini, miso
  • parsnips-bark and maple
  • brioche, mulled quince, hibiscus
  • chestnut, carmel, chocolate
  • frosted nog

E By Jose Andres, Las Vegas

Show Credits:

This episode was hosted by Melissa Goldberg 

Special thanks to my Program Director and Producer Shea Gunther

You can learn more about me at www.eatwelltraveloften.net.

Email melissa@eatwelltraveloften.net

Instagram @eatwelltraveloftenpodcast

Facebook @eatwelltraveloftenpodcast 

I can also be found on Instagram @farmandforksociety @greenluvin

January 24, 2020 food

Lemon Maple Curd

Winter is citrus season. Well, not where I live but my friends out West are getting an abundance of citrus this time of year. Good thing I have nice friends and family that share! Sometimes my Aunt will send me lemons from her yard or recently I was in California and had to snag a bunch of fresh lemons from the tree in my friends backyard.

Lime tree in my friend’s back yard in LA! So jealous!
Lemons from my Aunt’s yard in Arizona

One of my favorite lemon recipes is lemon curd. Traditionally served with scones at afternoon tea in Britain, curd can be also used in tarts, pies or folded into whipped cream for filling in cream puffs. I love it on pancakes, crepes or just right out of the jar.

Curd is easy to prepare and you do not have to use lemons. You can try any other citrus fruit you like such as blood oranges, passion fruit, grapefruits and limes. My curd recipe is sweetened with maple syrup instead of sugar. If you prefer honey, you can swap it for the maple syrup.

The key to making curd is to get everything ready before you start combining ingredients. And remember to zest your lemons before you juice them!

Print Recipe

Lemon Maple Curd

Ingredients

  • 4 tablespoons unsalted butter cut into small pieces
  • ⅓ cup maple syrup
  • 4 large egg yolks
  • 2 large eggs
  • ⅔ cup fresh squeezed lemon juice 6-8 lemons
  • 1 tablespoon finely grated lemon zest

Instructions

  • Fill a medium sauce pan or pot with water.
  • Boil water.
  • Once water is boiling, place a heat resistant bowl (glass is best) on top of pot so that the water just hits the bottom bowl and lower heat to a simmer.
  • Take a fine mesh strainer put on top of another bowl and set aside. You will need this later after curd has set. It is important you have ready because your curd sets fast!
  • Place butter in bowl that is on top of bowling water to melt.
  • Once melted add maple syrup.
  • In separate bowl, beat eggs and yolk.
  • Pour in the fresh lemon juice and grated zest into bowl with butter and syrup.
  • Slowly add in eggs and whisk constantly.
  • Cook until the mixture has thickened and becomes jelly-like. Approximately 5-7 minutes but it can take longer.
  • With a pot holder lift bowl off the top of pot and pour curd into your strainer which is sitting on top of a clean bowl.
  • With a spatula or spoon press curd through the mesh leaving behind the zest and any egg that may have cooked.
  • Pour the curd into a jar or storage container and let cool before you put a top on.
  • Curd last for a couple weeks in the refrigerator.

January 22, 2020 food

Ricotta Gnocchi, Lateral Cooking: One Dish Leads to Another

The basis for Niki Segnit’s cookbook, Lateral Cooking: One Dish Leads to Another, is she gives you starting points and connected recipes called continuums. There are 12 continuums in the book. In the Cornbread, Polenta, Gnocchi chapter you start with a basic cornbread recipe that will eventually lead you to gnocchi.

Instead of potato these gnocchi are made with ricotta.

Print Recipe

Ricotta Gnocchi

The lightest of all gnocchi, and the easiest to make well. Relatively quick, too, once, the ricotta has been drained. As with potato gnocchi, the flour—again, used In the smallest quantity possible—helps the main ingredient cohere. Ricotta gnocchi are excellent with summer vegetables and leaves, or floated in a light broth.
Course: Appetizer, Main Course
Cuisine: Italian
Author: Niki Segnit

Ingredients

  • 1 cup Whole milk ricotta
  • 1/3 cup All-purpose flour
  • 1/2 cup Finely grated Parmesan
  • 1 Egg beaten
  • Grating of nutmeg
  • Fine semolina or rice flour for dusting

Instructions

  • Drain the ricotta for at least 30 minutes or, preferably, overnight in the fridge.
  • Spread out the ricotta on a plate, then evenly sprinkle over the flour, Parmesan, egg, and nutmeg, and quickly form into a soft, wet dough. As for potato gnocchi, you want to handle the dough as little as possible.
  • Flour your hands. Roll about 2 tsp of the mixture into a cork shape or a ball, drop it onto a plate of flour, and dust with a fine veil of the semolina or rice flour. If the mixture seems too wet to roll, try dropping a dollop of mixture onto a lightly floured plate, and using a fork rather than your hands to fashion it into a shape.
  • Bring some salted water to the boil in a large saucepan and submerge your first gnoccho. It should hold together and bob up to the surface after about a minute. Leave it to simmer for a minute more, before lifting it out with a strainer or slotted spoon and testing it for texture. If it passes, form the rest of the mix into your chosen shapes. If it falls apart, add a little more flour and test again. The idea is to get the ricotta mix to cohere with as little flour as possible.
  • Cook your gnocchi in batches. If you’re not serving them immediately, or tossing them straight into a pan of sauce, keep the cooked and drained gnocchi warm in a covered dish in the oven at 200°F. You may find that having two pans of simmering water on the go makes this less laborious.

Notes

For about 32 cork-shaped gnocchi, enough to serve 2 as a small main course or 4 as a starter.
Courtesy of Niki Segnit, Lateral Cooking

January 20, 2020 podcast

An interview with Niki Segnit: Lateral Cooking

https://media.blubrry.com/eatwelltraveloften/p/content.blubrry.com/eatwelltraveloften/EWTO_Niki_Segnit_FULL_SHOW.mp3

Podcast: Play in new window | Download | Embed

Subscribe: Android | RSS

Niki Segnit:  Lateral Cooking One Dish Leads to Another

Cookbook author Niki Segnit is the author of the The Flavour Thesaurus and her newest cookbook Lateral Cooking: One Dish Leads to Another. The premise of this newest book is if we can master one simple dish then we’ve got the start of a very clear path to creating a whole host of other dishes. Niki calls these connected recipes continuums and the book is made up of 12 of them. I was fortunate enough to sit with Niki on three different occasions while she was in town.  First she joined in on my cookbook club, did this interview and then at the evening Book to Plate event at my local bookstore. It was so great learning from her!  

Links to Niki Segnit’s social media and other items mentioned in the interview:

Instagram @nikisegnit

Website: https://www.nikisegnit.com

Books: Lateral Cooking: One Dish Leads to Another and The Flavour Thesaurus

Favorite UK Restaurant:  Bobby’s in Leicester

Show Credits:

This episode was hosted by Melissa Goldberg 

Special thanks to my Program Director and Producer Shea Gunther

You can learn more about me at www.eatwelltraveloften.net.

Email melissa@eatwelltraveloften.net

Instagram @eatwelltraveloftenpodcast

Facebook @eatwelltraveloftenpodcast 

I can also be found on Instagram @farmandforksociety @greenluvin

January 18, 2020 food

Maple Hazelnut Granola

I love granola.  I eat it almost everyday for breakfast — or for me it’s actually brunch. This recipe is my favorite. It is so simple to make and the maple syrup and hazelnuts is the best combination. You can add dried fruits or any nuts of your choice. It is great with yogurt, milk or nut milk.  It also makes an amazing topping for ice cream. And of course you can just eat it out of the jar.

Did you know that granola or granula was invented by a doctor at The Jackson Sanitarium a.k.a. Our Home on the Hillside in Dansville, New York in 1863? Dr. James Caleb Jackson had been sick most of his life and had an amazing recovery after taking hydrotherapy at a spa. Subsequently, he became an advocate for the use of water for healing, became a doctor and opened hydrotherapy spa. Our Home on the Hillside grew to be one of the largest in the world, catering for around 20,000 patients! Jackson believed the diet was the key to improving health. (Yes!) He was a vegetarian and promoted it with the emphasis on fruits, vegetables, and unprocessed grains. This was back in the late 1800s!!!  

At the spa, Jackson created a cereal known as Our Home Granula composed of graham flour and was similar to an oversized form of Grape-Nuts. Dr. John Harvey Kellogg another vegetarian and healthy diet advocate (who would have known!) created similar product but changed the name to Granola to avoid conflict with Dr. Jackson.

Granola took a long hiatus but was revived by the hippies the 1960s! Fruit and nuts were added and it was coined a “health food.” In 1969 at Woodstock, Wavy Gravy made granola popular by serving it to festival attendees! 

Now I now why I love granola so much.

Peace, Love, and Granola! ✌🏻 ❤️ 🥣

Print Recipe

Maple Hazelnut Granola

Crunchy granola is a favorite for breakfast sprinkled over yogurt. But this Maple Hazelnut Granola is so delicious you can just eat it by the handful. Made with real Vermont maple syrup!
Prep Time15 mins
Cook Time30 mins
Course: Breakfast, Snack
Keyword: Granola, Maple Syrup

Ingredients

  • 3 cups old-fashioned rolled oats I like Bob’s Red Mill Thick Cut Gluten Free Oats
  • 1 cup hazelnuts toasted and peeled
  • 1 teaspoons salt
  • 2 teaspoon cinnamon
  • 1/2 cup olive oil
  • 1/2 cup maple syrup
  • 1 teaspoon vanilla

Instructions

  • Preheat the oven to 350°F.
  • Place a piece of parchment or silicone baking sheet on a large cookie sheet.
  • Toast hazelnuts for 10-15 minutes until slightly brown.
  • Rub skins off hazelnuts with a towel or by hand. I like to just rub them together.
  • Combine oats, hazelnuts, salt and cinnamon together in a large bowl.
  • Stir in the oil, maple syrup, and vanilla. Mix until thoroughly coated.
  • Pour mixture out onto two cookie sheets and bake for about 25-30 minutes until light brown and toasty.
  • Stir every 5 minutes or so for an even color and to make sure the granola is cooking evenly.
  • Once cool enough, use the back of a spoon or the flat end of a meat tenderizer to break up hazelnuts into smaller pieces.
  • Let cool.

Notes

If you like chopped dried fruit in your granola, stir in once it comes out of the oven or just add prior to eating. (Dried cranberries are a good choice.)
Links to Products Mentioned
Meat Tenderizer
Bob’s Red Mill Gluten Free Oats

January 16, 2020 food

Chicken, Cider, and Cheddar Crumble, Apple: Recipes from the Orchard

James Rich calls this the three Cs crumble. To see how it’s made check out the video of James in action. If you make it let me know how it comes out! And to find out more about James Rich and his book Apple: Recipes from the Orchard take a listen to my interview with him! And the end of the interview, I talk about my experience cooking from the book!

Print Recipe

Chicken, Cider and Cheddar Crumble

This savoury crumble recipe is a powerhouse of comfort food! It hits that spot when you need something to help ward off those cold winter nights. The recipe came to James when he was exploring how to combine some of his favourite ingredients together; chicken, cheese and cider! Cider and chicken go really well together, and James has a few recipes in his book that celebrate this partnership, plus he went to school in Cheddar (in the UK), so James really had no choice on the cheese selection for this dish.

You can make this ahead of time – it’s great for leaving for a day or so – just make it to the point before adding the crème fraîche and chill until needed. When you’re ready, take out of the fridge, add the crème fraîche and top with the crumble topping before baking.
Prep Time20 mins
Cook Time40 mins
Course: Main Course
Servings: 6
Author: James Rich

Ingredients

  • 2 tablespoons olive oil
  • 1 large onion chopped
  • 2 celery stalks chopped
  • 2 carrots chopped
  • 2 garlic cloves crushed 100 g (3 1⁄2 oz) mushrooms, sliced
  • 350 g 12 oz skinless boneless chicken thighs, cut into chunks
  • 1 teaspoon dried oregano
  • 1 cooking apple such as a Bramley, peeled and cored
  • 1 tablespoon wholegrain mustard
  • 200 ml 7 fl oz/scant 1 cup dry cider
  • 100 g 3 1⁄2 oz/scant 1⁄2 cup crème fraîche
  • salt and freshly ground black pepper
  • For the crumble
  • 250 g 9 oz/2 cups all-purpose flour
  • 1 teaspoon mustard powder
  • salt and freshly ground black pepper
  • 150 g 5 oz butter, at room temperature, diced
  • 150 g 5 oz mature Cheddar, grated (shredded)
  • 30 g 1 oz/1⁄4 cup hazelnuts, chopped

Instructions

  • Preheat a fan oven to 180°C (350°F/gas 6).
  • Heat the oil in a large frying pan (skillet) over a medium heat and fry the onion, celery and carrots for 5 minutes until they begin to soften. Add the garlic and mushrooms and fry for a further 3 minutes.
  • Add the chicken and oregano to the pan and continue frying for another 10 minutes until the chicken has cooked through and is beginning to brown. Cut the apple into 8 wedges, add to the pan and fry for a further 2 minutes.
  • Next, add the mustard and stir in well. Then pour in the cider and increase the heat. Cook on a high heat for 3–5 minutes until the alcohol has burnt off and liquid has reduced by about a quarter. Turn off the heat, stir in the crème fraîche and season to taste with salt and pepper. Then transfer to a large baking dish.
  • To make the crumble topping, put the flour, mustard powder and some salt and pepper in a bowl and mix together. Add the butter, then rub between your fingers and thumbs until you have a breadcrumb-like mixture. Stir in the cheese and hazelnuts and mix well.
  • Top the apple, chicken and cider with the crumble and bake in the oven for 25 minutes until the crumble is golden brown and crunchy. Serve with your favourite vegetables.

Notes

From page 80 of Apple: Recipes from the Orchard

January 11, 2020 food

Cranberry Scones

These cranberry scones are the most requested recipe in my house. I figured that would make the perfect starting point for the food section of the site. I have made these scones so many times that I could most likely do it without the recipe. They always come out flaky and delicious.

The scone is best know as an British baked good. The first scone dates back to the early 1500s but it became popular in the 1800’s when Anna, the Duchess of Bedford’s servant brought her tea with scones. She loved them so much that she ordered them everyday starting the tradition of Afternoon Tea.

They can be sweet or savory. I prefer savory but James Rich in Apples: Recipes from the Orchard has a great savory scone that I talk about in the “Book to Plate” segment of my podcast interview with James.

You don’t need any special equipment to make these although to make blending the butter easy I love using a pastry blender. Sometimes you may need to add a little more liquid than the recipe calls for the dough to form. Just do it a little at time. Hope you enjoy them as much as I do!

Print Recipe

Cranberry Scones

Servings: 8 scones

Ingredients

  • 2 cups All-purpose flour plus more for work surface
  • 5 tablespoons Sugar
  • 1 tablespoon Baking powder
  • 1/2 teaspoon Salt
  • 6 tablespoons Chilled unsalted butter cut into small pieces
  • 2/3 cup Heavy cream (Can use half-and-half or milk) You may need more to get batter moist
  • 1 teaspoon Vanilla
  • 1/2 cup Halved cranberries (Frozen are easier to use)

Instructions

  • Preheat oven to 425 degrees. In a bowl, whisk together flour, 5 tablespoons sugar, baking powder, and salt. Cut in butter with a pastry blender or two knives until mixture resembles coarse crumbs. Stir in 2/3 cup half-and-half (may need more) and vanilla until just moistened. May need more liquid to make batter come together. Gently fold in cranberries.
  • On a lightly floured surface, knead dough gently, 5 to 10 times. Pat into a 1-inch-thick round. Cut into 8 wedges; place on a baking sheet, 2 inches apart. Bake until golden brown, 12 to 15 minutes. Let cool on a wire rack.

January 3, 2020 podcast

An interview with James Rich: Apple Recipes from the Orchard

https://media.blubrry.com/eatwelltraveloften/p/content.blubrry.com/eatwelltraveloften/ewto_ep1.mp3

Podcast: Play in new window | Download | Embed

Subscribe: Android | RSS

JAMES RICH: Apple Recipes from the Orchard

James Rich is the author of Apple: Recipes from the Orchard. James travelled across the Atlantic Ocean to join me at my local book store, The Book House, for my monthly cookbook author events — Book to Plate. James was raised in Somerset, England where he grew up on a cider farm. Growing up he was deeply connected to the world of apples and learned to explore food and flavors in the kitchen by his grandmother. 

Links to James Rich’s social media and other items mentioned in the interview.

Instagram @james_rich

Facebook @jamesrichcooks

James’ Website: https://www.jamesrichcooks.com

Book: Apple Recipes from the Orchard

Family Farm, Restaurant and Cider:  https://richscider.co.uk

Ciders

  • Original Sin
  • Eve’s Ciderey
  • Brooklyn Cider 
  • Ironbound Cider

James’ Favorite Restaurant in UK:  Jikoni London

Show Credits:

This episode was hosted by Melissa Goldberg 

Special thanks to my Program Director and Producer Shea Gunther

You can learn more about me at www.eatwelltraveloften.net.

Email melissa@eatwelltraveloften.net

Instagram @eatwelltraveloftenpodcast

Facebook @eatwelltraveloftenpodcast 

I can also be found on Instagram @farmandforksociety @greenluvin

  • « Go to Previous Page
  • Go to page 1
  • Go to page 2
  • Go to page 3
  • Go to page 4
  • Go to Next Page »

Primary Sidebar

Eat Well, Travel Often is a podcast about the intersection of food, travel, the environment, the mind, body and spirit.

Recent Posts

  • Interview with Elana and Yaniv Livneh and Bary Yogev, Liv Bread
  • Interview with Max Goldman, FarmLink
  • Interview with Dr. Mona, Functional & Integrative Medicine
  • Interview with Dr. Ron Weiss, Ethos Health
  • Interview with Reggie Bryant and Jessica Johnson, Jobs in NYC

Please follow & like us :)

RSS
Follow by Email
Facebook
Facebook
fb-share-icon
YouTube
Instagram

Copyright © 2023 Eat Well, Travel Often Podcast on the Cookd Pro Theme